SharePoint 2010 context menu item with custom code
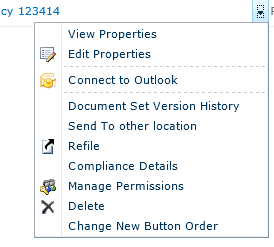
List items in SharePoint lists and document libraries have a “context menu” on the Filename/FileLeafRef field. When you hover to the right of the field, you see a drop down menu with a bunch of options. You can add your own items to this list, and also run custom code when the item is clicked. This tutorial will show you how, using Visual Studio 2010 and SharePoint 2010.
Edit: 16/02/2012 - there were a few comments about the custom assembly not firing. I’ve revised the post below to include an extra bit in the XML to ensure the control loads (see #13.)
In SharePoint terminology, the context menu on a list item is called the EditControlBlock. We can create a CustomAction to add an item to the EditControlBlock. It can be added to four different types: Content Type, List, ProgID or File Type. In this example, we will attach to a Content Type. More info on the types.
-
In Visual Studio, create a new empty SharePoint project, called SPTest.CustomMenuItem. Use your local SharePoint site to debug, and deploy as a Farm Solution.
-
Right-click your new project, and go Add > New Item. Choose Empty Element, and name it ContextMenuItem.
-
Add the following XML within the Elements section:
<customaction Id="SPTest.CustomMenuItem.ButtonClicked"
                RegistrationType="ContentType"
                RegistrationId="0x0101"
                Location="EditControlBlock"
                ImageUrl="/_layouts/IMAGES/DOCLINK.GIF"
                Sequence="600"
                Title="Click Me!"
                Description="Shows an alert message for this content type."
                >
    <urlaction Url="javascript:alert('Hello World!');"></urlaction>
 </customaction>
-
This is actually all you need to create a custom menu item. This will be attached to documents of Content Type Document and any documents that inherit from document! Neat. To attach to other types, or your custom content types, change the RegistrationId attribute. Hint: to find the ID of a content type, find it in Site Settings > Site Content Types and click to view. The ID is in the URL bar.
-
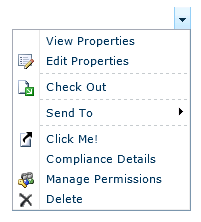
Right-click your project and Deploy. Open up your SharePoint site, find a document that is using the specified Content Type, and open the context menu. You should see your new button:
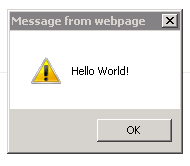
- And when clicked:
Well, Hello World is great and all, but how do you actually make it do something useful, like run some custom code? Let’s see. This will just write out a file with something in it, but obviously your code could do moreorless whatever you want.
-
Back in Visual Studio, add an empty C# (or VB!) Class to your Project. Call it CustomItemAction. Add a reference to System.Web.
-
Update your code to inherit from SPLinkButton and a few other bits:
using System.IO;
using System;
using System.Collections.Generic;
using System.Linq;
using System.Text;
using Microsoft.SharePoint;
using Microsoft.SharePoint.WebControls;

namespace SPTest.CustomMenuItem
{
    public class CustomItemAction : SPLinkButton
    {
                protected override void OnLoad(EventArgs e)
        {
            base.OnLoad(e);

            if (this.Page.Request["__EVENTTARGET"] == "SPTest.CustomMenuItem.ButtonClicked")
            {
                int itemId = Convert.ToInt32(this.Page.Request["__EVENTARGUMENT"]);

                System.IO.TextWriter writer = new StreamWriter(@"C:\custommenuoutput.txt", true);

                writer.WriteLine("Event Fired at:" + DateTime.Now.ToLongTimeString() + ": Item ID:" + itemId.ToString());

               writer.Close();

            }

        }
    }
}
-
Now - Deploy your project again. This won’t actually work yet, but we need to get some info in order to wire up our CustomAction to our custom class.
-
On the machine, navigate to C:Windowsassembly. In the items, find SPTest.CustomMenuItem. View the properties of it, and note/copy the Public Key Token.
-
We can now link our CustomAction to our Class. In Elements.xml file, add the following attributes:
ControlAssembly="SPTest.CustomMenuItem, Version=1.0.0.0, Culture=neutral, PublicKeyToken={PublicKeyToken}"
                ControlClass="SPTest.CustomMenuItem.CustomItemAction"
Replace {PublicKeyToken} with the token you noted down from the assembly.
- We also need to update the UrlAction to send a Postback, to trigger the event.
<urlaction Url="javascript:__doPostBack('SPTest.CustomMenuItem.ButtonClicked',{ItemId});"></urlaction>
- We also need to tell SharePoint to load the control:
<control ControlAssembly="SPTest.CustomMenuItem, Version=1.0.0.0, Culture=neutral, PublicKeyToken={PublicKeyToken}"
                ControlClass="SPTest.CustomMenuItem.CustomItemAction" Sequence="50" Id="AdditionalPageHead"></control>
- Your finished Elements.xml file should look like this:
< ?xml version="1.0" encoding="utf-8"?>
<elements xmlns="http://schemas.microsoft.com/sharepoint/">
<control ControlAssembly="SPTest.CustomMenuItem, Version=1.0.0.0, Culture=neutral, PublicKeyToken={PublicKeyToken}"
                ControlClass="SPTest.CustomMenuItem.CustomItemAction" Sequence="50" Id="AdditionalPageHead"></control>
<customaction Id="SPTest.CustomMenuItem.ButtonClicked"
                RegistrationType="ContentType"
                RegistrationId="0x0101"
                Location="EditControlBlock"
                ImageUrl="/_layouts/IMAGES/DOCLINK.GIF"
                Sequence="600"
                Title="Click Me!"
                Description="Writes out a file..."
ControlAssembly="SPTest.CustomMenuItem, Version=1.0.0.0, Culture=neutral, PublicKeyToken={PublicKeyToken}"
                ControlClass="SPTest.CustomMenuItem.CustomItemAction"
                >
<urlaction Url="javascript:__doPostBack('SPTest.CustomMenuItem.ButtonClicked',{ItemId});"></urlaction>
 </customaction>
</elements>
-
One last thing…! Since we have a custom control, we need to tell SharePoint that it’s safe to load by updating the web.config. Navigate to your IIS folder for your web site, (usually C:inetpubwwwrootwssVirtualDirectories80) and open up web.config in notepad, or VS etc.
-
Search for the SafeControls element, and at the bottom of the block, add:
<safecontrol Assembly="SPTest.CustomMenuItem, Version=1.0.0.0, Culture=neutral, PublicKeyToken={PublicKeyToken}" Namespace="SPTest.CustomMenuItem" TypeName="*" Safe="True" SafeAgainstScript="False"></safecontrol>
Again, replace {PublicKeyToken} with your specific token. Save the file.
-
Deploy your SharePoint project.
-
Restart IIS and SharePoint Admin Service.
-
Now when you click your custom button, it should create a file in the root of C: called custommenuoutput.txt with the ID of the item you passed in.
And that’s it! Hope you enjoyed this - any issues, please add a comment.
Some credit…
This post was galvanised from info from here which showed how to add the button, not the custom code, and here, which showed how to use the custom code, but note that you don’t actually need a “dummy” CustomAction - you can handle it just fine from the first one.


